Mac pro install Ubuntu 12.04
Table of Contents
Determine your hardware revision1
OS X
click in OS X on the Apple on the top left, then "About this Mac" – "More Info…", see the generation in the "Model Identifier" row; or …
ubuntu
sudo dmidecode -s system-product-name
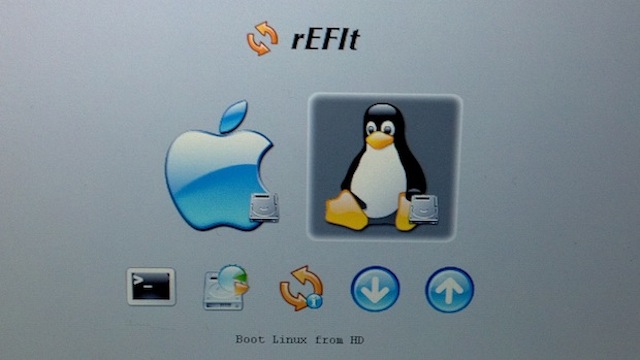
Install rEFIt and Partition Your Mac's Hard Drive(Dual-Boot: Mac OSX and Ubuntu)
First, install the rEFIt boot manager
http://refit.sourceforge.net/doc/c1s1_install.html To confirm that the app is working, reboot your system: if you see a startup menu like the one below, you're good. It may take a couple of reboots to appear, but it worked on the first try for me.
Partition Your Mac's Hard Drive
- Open Disk Utility (Applications > Utilities > Disk Utility.)
- Select your hard drive from the list on the left, and click the Partition tab on the right.
- You'll see the current partition layout. Click the right corner of the current partition and shrink it to the size you want. The display will show you the minimum size, so don't worry about going too far. Alternatively, just select the current partition and type in the final size
- Click apply. Disk Utility will shrink the current partition for you and free up space for your Ubuntu install.
Install Ubuntu
Now that your Mac's hard drive has room for Ubuntu, pop in your freshly burned Ubuntu CD and reboot. rEFIt will appear and ask you if you'd like to boot to the CD. Select the CD and let Ubuntu start up. It may take a while, but be patient. Once it's up and running, it'll ask you if you want to try Ubuntu (as a Live CD) or install it.
start the Ubuntu Installer from the desktop icon. When prompted, choose to manually partition. Select the EXT4 partition and click change. Select to use the space as the EXT4 filesystem and root (/) as the mount point. You will also want to check the box to format the partition.
Note: if there is a warning for booting, I just ignore it and it has no problem.
Let rEFIt Fix Your Partition Tables
According to Ubuntu's Mactel installation guide, there's a bug in the Ubuntu installer that can cause boot problems after installing and cause problems booting into OS X or Ubuntu. Thankfully, it's an easy fix for rEFIt, you just have to boot into rEFIt's partition tool and check. Here's how:
- Reboot your Mac. When rEFIt appears, select the "Partition Tool" from the startup menu.
- The tool will load automatically. In most cases, rEFIt will notice the problem, and ask you for permission to sync your partition tables. Type "Y."
- The process takes a couple of seconds, but when it's finished, shut down your Mac. rEFIt hasn't read the new partition tables yet, so if you try to boot into anything at this stage, your Mac will hang.
- Start your Mac again, and pick your preferred OS. If you enter the Partition Tool again, you'll see a notification that your partition tables are in sync.
Now here's the catch: If the rEFIt partition tool tells you that the tables are out of sync but doesn't offer to fix them, or if you see another strange error message, head over to this section of the Ubuntu install guide and scroll down to "Fix Your Partition Tables" for a breakdown of what you should do for each type of error.
configuration
bluetooth
if you disable Bluetooth coexistence protection in the B43 driver, then Bluetooth will be able to coexist with WiFi. I
# remove b43
sudo modprobe -r b43
# reinsert b43, with the right settings
sudo modprobe b43 btcoex=0
open your favorite text editor as root and edit /etc/modprobe.d/options and append the following line: options b43 btcoex=0
gksu gedit /etc/modprobe.d/options
options b43 btcoex=0
or
sudo sh -c "echo 'options b43 btcoex=0' >> /etc/modprobe.d/options"
Screen(Not)
The resolution is right recognised, the LED-backlit works properly.
NOTE: In order to be able to adjust the brightness you will have to install the apple-gmux package and boot with acpibacklight=vendor kernel parameter which you can set e.g. in the /etc/default/grub file in GRUBCMDLINELINUX line. Details: https://wiki.ubuntu.com/Kernel/AppleGmuxBacklight
Colors
import these profiles as .icc files in System Settings - Color by
selecting the appropriate screen icon, clicking "add profile" and
navigating to the .icc files (located in OS X under
/Users/username/Library/ColorSync/Profiles or
/Library/ColorSync/Profiles/Displays
if the settings were saved for all users). After this,
choosing the radio button under the new OS X profile should
yield a nice color profile.
HFS+
HFS is mounted as Read-Only. By turning journaling off in OS X, the HFS+ file system will be read/write under Linux.
This is the recommended solution if you need read/write access to your OS X partition.
It's also possible to mount HFS+ journaling-enabled volumes using the "-o force,rw" option though this is extremely risky.
Leaving the HFS's journaling turned on you're able to access it as root.
Touchpad
Works fine out-of-the-box. You can disable the mouse-click with the trackpad tap and the horizontal scrolling in Preferences.
Unity supports multitouch with this funcs:
1 finger
    move = move the cursor;
    click = "your-favourite-hand"-click;
2 fingers
    move = vertical/horizontal scrolling;
    click = "2nd-button"-click;
3 fingers
    move = move the window and shows resizing options;
4 fingers
    move = show/hide the launcher (horizontal-scroll, enable auto-hide the launcher first);
    single-tap = show the dash.
To get multitouch with just two finger scrolling and drag-and-drop follow these instructions:
sudo add-apt-repository ppa:mactel-support && sudo apt-get update
sudo apt-get install xserver-xorg-input-synaptics
- Palm Recognition
By default palm recognition is not turned off, so you might have trouble moving the cursor or clicking something by brushing the trackpad with your palm while typing. To turn palm recognition on, open up a terminal and copy your default conf file:
sudo cp /usr/share/X11/xorg.conf.d/50-synaptics.conf /etc/X11/xorg.conf.d/my-synaptics.conf
Now edit the new conf file:
gksudo gedit /etc/X11/xorg.conf.d/my-synaptics.conf
and add the following line just before the EndSection marker of your input class:
Option "PalmDetect" "on"
- Fine-tuning the touchpad
TODO External Monitor
External monitors connected via HDMI work out of the box.
If your external display's native resolution is not recognised when connected via a VGA port (only a lower resolution, such as 800x600 is offered, for example), then you need to issue a couple of xrandr commands in a terminal to force add the desired resolution. The source of information for this fix comes from here.
To check that xrandr is installed issue:
$ sudo apt-get install xrandr
You have to create a modeline using the gtf or cvt utility. For example, if you want to add a mode with resolution 1920x1080, you can enter the following command (The output is shown following):
$ cvt 1920 1080
# 1920x1080 59.96 Hz (CVT 2.07M9) hsync: 67.16 kHz; pclk: 173.00 MHz
Modeline "1920x1080_60.00"  173.00  1920 2048 2248 2576  1080 1083 1088 1120 -hsync +vsync
Then copy the information after the word "Modeline" into the xrandr command (which would in my example state):
xrandr --newmode "1920x1080_60.00" 173.00 1920 2048 2248 2576 1080 1083 1088 1120 -hsync +vsync
Now get the code of your external monitor by issuing xrandr. For me the external screen is branded DP1.
Now add this mode to the available ones for your external screen:
xrandr --addmode DP1 1920x1080_60.00
And select it:
xrandr --output DP1 --mode 1920x1080_60.00
If everything goes well, the resolution should be ok now and you'll have the desired option in the normal display preferences. This will have to be repeated every time. The easiest way to automate the task, add the 3 xrandr commands to the ~/.xprofile file.
$ gedit ~/.xprofile
The file should look something like:
xrandr --newmode "1920x1080_60.00"  173.00  1920 2048 2248 2576  1080 1083 1088 1120 -hsync +vsync
xrandr --addmode DP1 1920x1080_60.00
xrandr --output DP1 --mode 1920x1080_60.00
Afterwards, you have to add executable access to the file:
$ chmod +x ~/.xprofile
Note: if you make a mistake in the .xprofile file, you might have trouble reverting back to normal settings - in this case you can always use ctrl+alt+F1 to open the shell interface and issue mv ~/.xprofile ~/.xprofile-old; sudo reboot to get the previous settings back.
Sound
Works out-of the box, but some volume corrections are necessary.
You can install gnome-alsamixer for a nice GUI to set up your sound:
sudo apt-get install gnome-alsamixer
Wireless(more 2)
- Knowing what Broadcom Wireless Card you have
lspci -nn -d 14e4:

03:00.0 Network controller [0280]: Broadcom Corporation BCM4331 802.11a/b/g/n [14e4:4331] (rev 02)
The example wireless card PCI.ID
[14e4:4331] (rev 02)
For example, if you have previously installed the
bcmwl-kernel-sourcepackage, you will need to remove it by using the purge method:sudo apt-get purge bcmwl-kernel-source
- Preparing the System
sudo apt-get update
#update the Ubuntu list of PCI.IDs:
sudo update-pciids
- Installing the Package
sudo apt-get install linux-firmware-nonfree
sudo reboot
BROADCOM WIRELESS TABLE (Updated 31 March 2014)
PCI.ID              12.04 LTS                      13.10 / 14.04 LTS
------------------------------------------------------------------------------------
14e4:0576           Special Case #1                 Special Case #1
14e4:4301           firmware-b43legacy-installer    firmware-b43legacy-installer
14e4:4306           firmware-b43legacy-installer    firmware-b43legacy-installer
14e4:4306 rev 2     firmware-b43legacy-installer    firmware-b43legacy-installer
14e4:4306 rev 3     linux-firmware-nonfree          linux-firmware-nonfree
14e4:4307           linux-firmware-nonfree          linux-firmware-nonfree
14e4:4311           linux-firmware-nonfree          linux-firmware-nonfree
14e4:4312           linux-firmware-nonfree          linux-firmware-nonfree
14e4:4313           linux-firmware-nonfree          linux-firmware-nonfree
14e4:4315           firmware-b43-lpphy-installer    linux-firmware-nonfree
14e4:4318           linux-firmware-nonfree          linux-firmware-nonfree
14e4:4319           linux-firmware-nonfree          linux-firmware-nonfree
14e4:4320 rev 02    firmware-b43legacy-installer    linux-firmware-nonfree
14e4:4320 rev 03    linux-firmware-nonfree          linux-firmware-nonfree
14e4:4324           linux-firmware-nonfree          linux-firmware-nonfree
14e4:4325           firmware-b43legacy-installer    linux-firmware-nonfree
14e4:4328           bcmwl-kernel-source             linux-firmware-nonfree
14e4:4329           bcmwl-kernel-source             bcmwl-kernel-source
14e4:432a           bcmwl-kernel-source             bcmwl-kernel-source
14e4:432b           bcmwl-kernel-source             bcmwl-kernel-source
14e4:432c           bcmwl-kernel-source             bcmwl-kernel-source
14e4:432d           bcmwl-kernel-source             bcmwl-kernel-source
14e4:4331           linux-firmware-nonfree          linux-firmware-nonfree
14e4:4335           UNKNOWN                         linux-firmware-nonfree
14e4:4353           Special Case #1                 Special Case #1
14e4:4357           Special Case #1                 Special Case #1
14e4:4358           bcmwl-kernel-source             bcmwl-kernel-source
14e4:4359           bcmwl-kernel-source             bcmwl-kernel-source
14e4:4365           Special Case #2                 bcmwl-kernel-source
14e4:43a0           UNKNOWN                         bcmwl-kernel-source
14e4:4727           Special Case #3                 Special Case #1
14e4:a962           UNKNOWN                         linux-firmware-nonfree
------------------------------------------------------------------------------------
- DEBUGGING
- To configure your wireless devices through the terminal I recommend How to connect and disconnect to a network manually in terminal?
- If your connection drops every so often some users have suggested to set IPv6 to Ignore.
- If your laptop does not detect your wireless card some users have
mentioned that using
rfkill unblock all. - If you are getting b43-phy0 ERROR: Fatal DMA error / b43-phy0
warning: Forced PIO do the following:
sudo rmmod b43
sudo modprobe b43 pio=0 qos=0
Graphics
System info says
Graphics: unknown.
Driver: unknown,
Experience: Standard.
it means that it cannot acquire the information because glxinfo is not installed on the system.
Install it by clicking here: https://apps.ubuntu.com/cat/applications/mesa-utils/ Install via the software center
Or by typing:
sudo apt-get install mesa-utils
Install Software
lightum3
Lightum is a daemon to control the keyboard brightness and screen backlight on MacBook based laptops.
If you are running Ubuntu, you can install it by adding lightum-mba ppa to your system:
sudo add-apt-repository ppa:poliva/lightum-mba
sudo apt-get update
sudo apt-get install lightum
Otherwise, you can build it from source.
lightum-indicator4
sudo add-apt-repository ppa:poliva/lightum-mba
sudo apt-get update
sudo apt-get install lightum-indicator
ubuntu-tweak
sudo add-apt-repository ppa:tualatrix/ppa
sudo apt-get update
sudo apt-get install ubuntu-tweak
gnome
ubuntu 12.04 中安装gnome桌面的命令为:
sudo apt-get install gnome-session-fallback
也可以用:
sudo apt-get install gnome-panel
安装好gnome桌面后注销重新登录,在用户名右边有一个图标,可以选择使用进入的桌面,我选择了gnome classic,然后就可以重返经典的gnome桌面了。在删除unity桌面之前,要把ubuntu默认的登录界面也改为gnome,命令如下:
sudo /usr/lib/lightdm/lightdm-set-defaults -s gnome-classic
这是设置登录界面为 gnome classic的,如果你喜欢gnome3,则用:
sudo /usr/lib/lightdm/lightdm-set-defaults -s gnome-shell
接下来就可以卸载unity了。
sudo apt-get -y –auto-remove purge unity
sudo apt-get -y –auto-remove purge unity-commonp
sudo apt-get -y –auto-remove purge unity-lens*
sudo apt-get -y –auto-remove purge unity-services
sudo apt-get -y –auto-remove purge unity-asset-pool